【VB.net】丸いボタン、角の丸いボタンを作る

1.CircleButtonというプロジェクトを作る
2.プロジェクトにクラスファイルを追加する
3.クラスファイルにコードを書く
4.一度コンパイル(ビルド)する
5.ツールボックスから対応したコントロールをフォームに張り付ける
6.RoundButtonはプロパティRoundで丸みを調整できる

※貼り付けたコントロールのFlatAppearaanceのBorderSizeを0、FlatStyleをFlatにして下さい

以下クラスファイルに書くコード

EllipseButton.vb

Imports System.Windows.Forms
Imports System.Drawing.Drawing2D

Public Class EllipseButton
    Inherits Button

    Protected Overrides Sub OnPaint(pevent As PaintEventArgs)
        Dim gp As GraphicsPath = New GraphicsPath
        gp.StartFigure()
        gp.AddEllipse(0, 0, ClientSize.Width, ClientSize.Height)
        gp.CloseFigure()
        Me.Region = New System.Drawing.Region(gp)
        MyBase.OnPaint(pevent)
    End Sub
End Class
RoundButton.vb

Imports System.Windows.Forms
Imports System.Drawing.Drawing2D

Public Class RoundButton
    Inherits Button

    Protected Overrides Sub OnPaint(pevent As PaintEventArgs)
        Dim gp As GraphicsPath = New GraphicsPath
        Dim r As Single = pr
        Dim x As Single = 0.0F
        Dim y As Single = 0.0F
        Dim w As Single = ClientSize.Width
        Dim h As Single = ClientSize.Height
        gp.StartFigure()
        gp.AddArc(x, y, r, r, 180.0F, 90.0F)
        gp.AddArc(w - r, y, r, r, 270.0F, 90.0F)
        gp.AddArc(w - r, h - r, r, r, 0.0F, 90.0F)
        gp.AddArc(x, h - r, r, r, 90.0F, 90.0F)
        gp.CloseFigure()
        Me.Region = New System.Drawing.Region(gp)
        MyBase.OnPaint(pevent)
    End Sub

    Private pr = 50
    Public Property Round() As Single
        Get
            Return pr
        End Get
        Set(value As Single)
            pr = value
        End Set
    End Property

End Class

SideRoundButton.vb

Imports System.Windows.Forms
Imports System.Drawing.Drawing2D

Public Class SideRoundButton
    Inherits Button

    Protected Overrides Sub OnPaint(pevent As PaintEventArgs)
        Dim gp As GraphicsPath = New GraphicsPath
        Dim x As Single = 0.0F
        Dim y As Single = 0.0F
        Dim w As Single = ClientSize.Width
        Dim h As Single = ClientSize.Height
        gp.StartFigure()
        gp.AddArc(x, y, h, h, 90.0F, 180.0F)
        gp.AddArc(w - h, y, h, h, 270.0F, 180.0F)
        gp.CloseFigure()
        Me.Region = New System.Drawing.Region(gp)
        MyBase.OnPaint(pevent)
    End Sub
End Class
【C#】丸いボタン、角の丸いボタンを作る

1.CircleButtonというプロジェクトを作る
2.プロジェクトにクラスファイルを追加する
3.クラスファイルにコードを書く
4.一度コンパイル(ビルド)する
5.ツールボックスから対応したコントロールをフォームに張り付ける
6.RoundButtonはプロパティRoundで丸みを調整できる

※貼り付けたコントロールのFlatAppearaanceのBorderSizeを0、FlatStyleをFlatにして下さい

以下クラスファイルに書くコード

EllipseButton.cs

using System;
using System.Collections.Generic;
using System.Drawing.Drawing2D;
using System.Linq;
using System.Text;
using System.Threading.Tasks;
using System.Windows.Forms;

namespace CircleButton
{
    class EllipseButton : Button
    {
        protected override void OnPaint(PaintEventArgs pevent)
        {
            GraphicsPath gp = new GraphicsPath();
            gp.AddEllipse(0,0,ClientSize.Width,ClientSize.Height);
            this.Region = new System.Drawing.Region(gp);
            base.OnPaint(pevent);
        }
    }
}

RoundButton.cs

using System;
using System.Collections.Generic;
using System.Drawing;
using System.Drawing.Drawing2D;
using System.Linq;
using System.Text;
using System.Threading.Tasks;
using System.Windows.Forms;

namespace CircleButton
{
    class RoundButton : Button
    {
        protected override void OnPaint(PaintEventArgs pevent)
        {
            float r = pr;
            float x = 0.0f;
            float y = 0.0f;
            float w = ClientSize.Width;
            float h = ClientSize.Height;
            GraphicsPath gp = new GraphicsPath();
            gp.StartFigure();
            gp.AddArc(x , y ,  r , r , 180.0f , 90.0f);
            gp.AddArc(w - r, y , r , r, 270.0f , 90.0f);
            gp.AddArc(w - r , h - r , r , r, 0.0f , 90.0f);
            gp.AddArc(x , h - r , r , r , 90.0f, 90.0f);
            gp.CloseFigure();
            this.Region = new System.Drawing.Region(gp);
            base.OnPaint(pevent);
        }
        private int pr = 50;
        public int Round
        {
            set
            {
                pr = value;
            }
            get
            {
                return pr;
            }
        }
    }
}

SideRoundButton.cs

using System;
using System.Collections.Generic;
using System.Drawing;
using System.Drawing.Drawing2D;
using System.Linq;
using System.Text;
using System.Threading.Tasks;
using System.Windows.Forms;

namespace CircleButton
{
    class SideRoundButton : Button
    {
        protected override void OnPaint(PaintEventArgs pevent)
        {
            float x = 0.0f;
            float y = 0.0f;
            float w = ClientSize.Width;
            float h = ClientSize.Height;
            GraphicsPath graphics = new GraphicsPath();
            graphics.StartFigure();
            graphics.AddArc(x, y, h, h, 90.0f, 180.0f);
            graphics.AddArc(w - h, y, h, h, 270.0f, 180.0f);
            graphics.CloseFigure();
            this.Region = new System.Drawing.Region(graphics);
            base.OnPaint(pevent);
        }
    }
}

【Ruby】Tk(ツールキット)のダイアログのサンプルプログラム【Tk】

Tk.getOpenFile
Tk.getSaveFile
Tk.chooseDirectory
Tk.chooseColor
Tk.messageBox

Tk.getOpenFile

require 'tk'
root = TkRoot.new
root.title = "漢字のタイトル"
button_click = Proc.new {
  files=Tk.getOpenFile(
  #files=Tk::getOpenFile( #←これでも良い
    filetypes:"{{Textファイル} {.txt}} {{Rubyファイル} {.rb}} {{全てのファイル} {*}}", #スペースの区切り位置に注意
    title:"テキストファイルを開く", #ダイアログのタイトル
    initialdir:"c:\\users\\owner\\documents", #指定なしまたは不正パスの場合「ピクチャ」フォルダになる(Windows10)
    multiple:"true", #複数ファイル指定可能
    defaultextension:"rb" #拡張子が省略されて入力された場合のデフォルトの拡張子(OpenFileの時は意味ないので使わないほうが良い)
  )
  puts(files)
  safiles=files.split(/ /)  # multipleで複数選択可能の場合、ファイルパスはスペース区切りで得られる(途中ディレクトリ名またはファイル名にスペースが含まれる場合は注意)
  puts(safiles)
}
button = TkButton.new(root) do
   text "button"
   pack("side" => "left",  "padx"=> "50", "pady"=> "50")
end
button.command = button_click
#button.comman = button_click   ←これでもOK
Tk.mainloop

Tk.getSaveFile

require 'tk'
root = TkRoot.new
root.title = "漢字のタイトル"
button_click = Proc.new {
  files=Tk.getSaveFile(
  #files=Tk::getOpenFile( #←これでも良い
    filetypes:"{{Textファイル} {.txt}} {{Rubyファイル} {.rb}} {{全てのファイル} {*}}", #スペースの区切り位置に注意
    title:"テキストファイルを開く", #ダイアログのタイトル
    initialdir:"c:\\users\\owner\\documents\\Visual Studio Code", #指定なしまたは不正パスまたはc:\\users\\owner\\documentsの場合OneDrive(SkyDrive)の「ドキュメント」フォルダになる(Windows10)
    defaultextension:"rb" #拡張子が省略されて入力された場合のデフォルトの拡張子
  )
  puts(files)
  safiles=files.split(/ /)  # multipleで複数選択可能の場合、ファイルパスはスペース区切りで得られる(途中ディレクトリ名またはファイル名にスペースが含まれる場合は注意)
  puts(safiles)
}
button = TkButton.new(root) do
   text "button"
   pack("side" => "left",  "padx"=> "50", "pady"=> "50")
end
button.command = button_click
#button.comman = button_click   ←これでもOK
Tk.mainloop

Tk.chooseDirectory

require 'tk'
root = TkRoot.new
root.title = "漢字のタイトル"
button_click = Proc.new {
  folder=Tk.chooseDirectory(
  #folder=Tk::chooseDirectory( #←これでも良い
    title:"フォルダ指定", #ダイアログのタイトル
    initialdir:"c:\\Users\\owner\\Documents\\Visual Studio Code" #指定なしまたは不正パスの場合「OneDrive(SkyDrive)ドキュメント」フォルダになる(Windows10)
  )
  puts(folder)
}
button = TkButton.new(root) do
   text "button"
   pack("side" => "left",  "padx"=> "50", "pady"=> "50")
end
button.command = button_click
#button.comman = button_click   ←これでもOK
Tk.mainloop

Tk.chooseColor

require 'tk'
root = TkRoot.new
root.title = "漢字のタイトル"
button_click = Proc.new {
  color=Tk.chooseColor(
  #color=Tk::chooseColor( #←これでも良い
    title:"色の選択", #ダイアログのタイトル
    initialcolor:"#ff0000" #デフォルトの色
  )
  puts(color)
}
button = TkButton.new(root) do
   text "button"
   pack("side" => "left",  "padx"=> "50", "pady"=> "50")
end
button.command = button_click
#button.comman = button_click   ←これでもOK
Tk.mainloop

Tk.messageBox

require 'tk'
root = TkRoot.new
root.title = "漢字のタイトル"
button_click = Proc.new {
  ans=Tk.messageBox(
  #color=Tk::messageBox( #←これでも良い
    title:"メッセージ", #ダイアログのタイトル
    type:"yesnocancel", #ok,okcancel,yesno,yesnocancel,retrycancel,abortretryignore
    icon:"error", #info,error,question,warning
    message:"いずれかのボタンを押してください"
  )
  puts(ans)
}
button = TkButton.new(root) do
   text "button"
   pack("side" => "left",  "padx"=> "50", "pady"=> "50")
end
button.command = button_click
#button.comman = button_click   ←これでもOK
Tk.mainloop

VSCodeでC言語(gcc)のデバッグをできるようにする方法

VSCodeC言語(gcc)のデバッグをできるようにする方法

環境
Windows10
VSCode
MinGW(gcc)

デバッグ環境を作る手順は以下の通り

  1. cファイルの作成
  2. c_cpp_properties.jsonの作成
  3. tasks.jsonの作成
  4. launch.jsonの作成
  5. launch.jsonの編集
  6. 実行ファイルの作成
  7. デバッグを実行
  8. 実行状態(結果)の表示
  9. デバッグでバグがありcファイルを編集したとき

1. cファイルの作成

まずフォルダとcファイルを作成します
ここではhelloフォルダとhello.cです
hello.c
※cファイルはShift-Jisで保存してください(UTF-8で保存した場合はtasks.jsonを編集する必要があります)
これは3. tasks.jsonの作成で後述します
hello.c

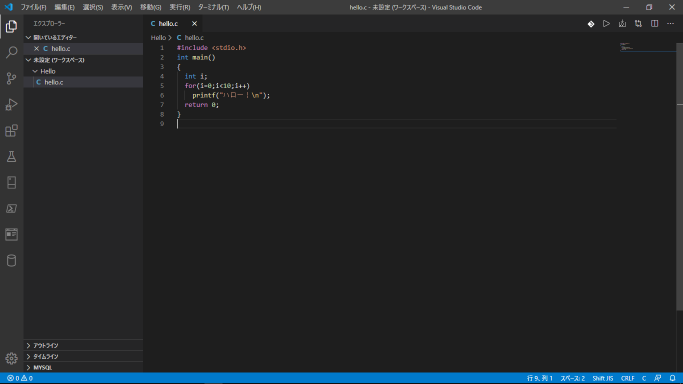
#include <stdio.h>
int main()
{
  int i;
  for(i=0;i<10;i++)
    printf("ハロー!\n");
  return 0;
}

f:id:Jikoryuu:20200531144006p:plain

2. c_cpp_properties.jsonの作成

c_cpp_properties.jsonファイルを作成するには以下の手順を行います
Ctrl+Shift+Pを押します
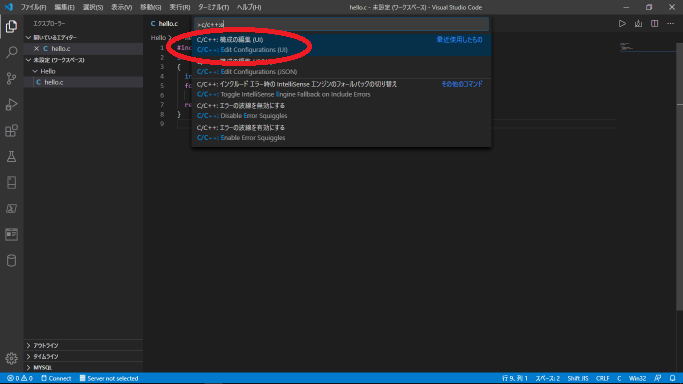
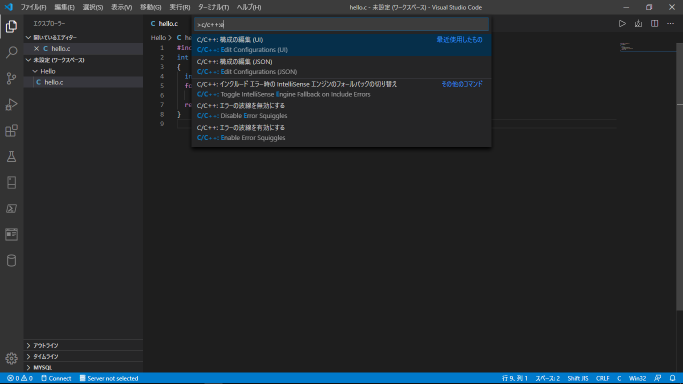
コマンドパレットが開くので「c/c++:e」と入力すると以下リストが現れます
f:id:Jikoryuu:20200531144103p:plain
C/C++:構成の編集(UI)」を選択します
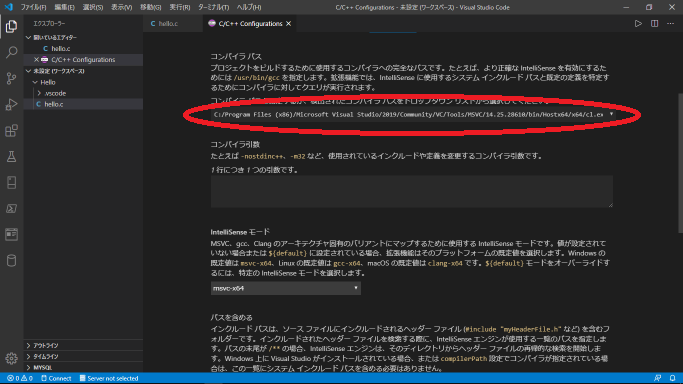
f:id:Jikoryuu:20200531144147p:plain
C/C++ Configurasions」のUI(ユーザーインターフェース)が開きます
f:id:Jikoryuu:20200531144225p:plain
コンパイラ パス」の▼を押してリストを表示する
f:id:Jikoryuu:20200531144329p:plain
「C:/MinGW/bin/gcc.exe」を選択します
f:id:Jikoryuu:20200531144418p:plain
「IntelliSenseモード」がエラーになるので▼を押してリストを表示します
f:id:Jikoryuu:20200531144507p:plain
リストから「gcc-x64」(gcc-x86でも可)を選択します
f:id:Jikoryuu:20200531144550p:plain
f:id:Jikoryuu:20200531144617p:plain
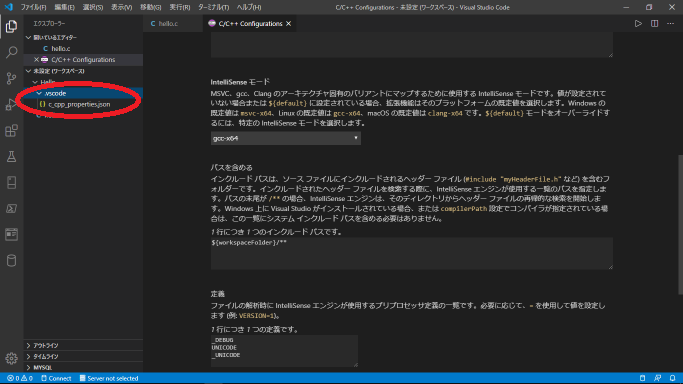
暫くすると「c_cpp_properties.json」ファイルが自動的に作成されます
f:id:Jikoryuu:20200531144649p:plain
エクスプローラーの「c_cpp_properties.json」ファイルを確認します
f:id:Jikoryuu:20200531144742p:plain

3. tasks.jsonの作成

再びCtrl+Shift+Pを押します
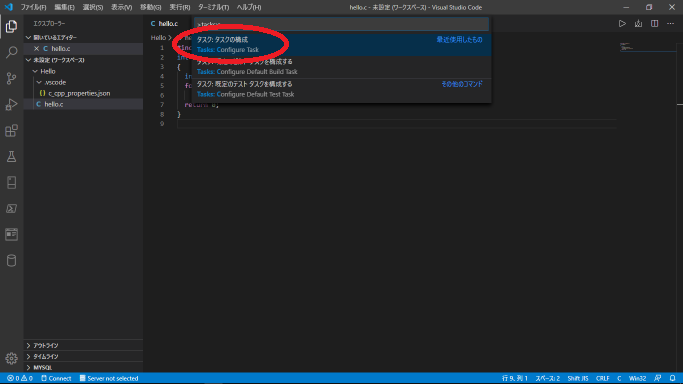
コマンドパレットが開くので「tasks:c」と入力すると以下リストが現れます
「タスク:タスクの構成」を選択します
f:id:Jikoryuu:20200531144817p:plain
続けて「テンプレートからtasks.jsonを生成」を選択
f:id:Jikoryuu:20200531144844p:plain
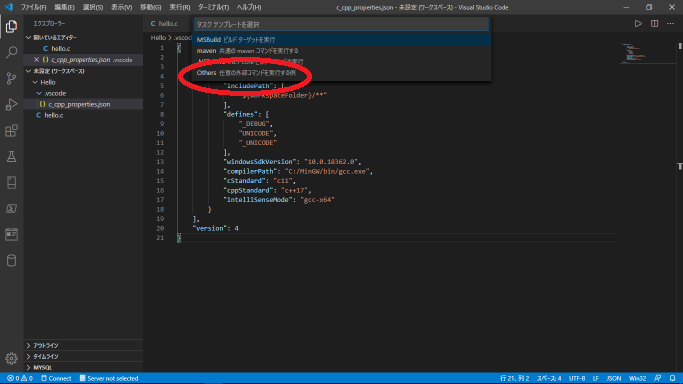
「Others 任意の外部コマンドを実行する例」を選択
f:id:Jikoryuu:20200531144927p:plain
再びコマンドパレットに「tasks:c」と入力すると絞り込まれた候補がリストに現れるのでその中から「タスク:タスクの構成」を選択します
f:id:Jikoryuu:20200531145012p:plain
「構成するタスクを選択」のリストから「shell gcc.exe build active file」を選択
f:id:Jikoryuu:20200531145047p:plain
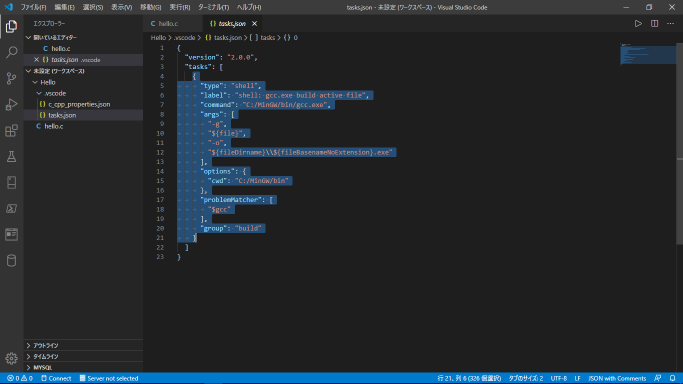
下の画像のような「tasks.json」が作成されます
f:id:Jikoryuu:20200531145122p:plain
もし違う内容のものが作成されたら「tasks.json」を削除して作成し直してください

※cファイルをUTF-8で保存している場合は「tasks.json」を編集する必要があります
具体的にはtasks項目のargsパラメーターに「-fexec-charset=CP932」を追加します

			"args": [
				"-g",
				"${file}",
				"-o",
				"${fileDirname}\\${fileBasenameNoExtension}.exe"
			],

			"args": [
				"-g",
				"${file}",
				"-o",
				"${fileDirname}\\${fileBasenameNoExtension}.exe",
				"-fexec-charset=CP932"
			],

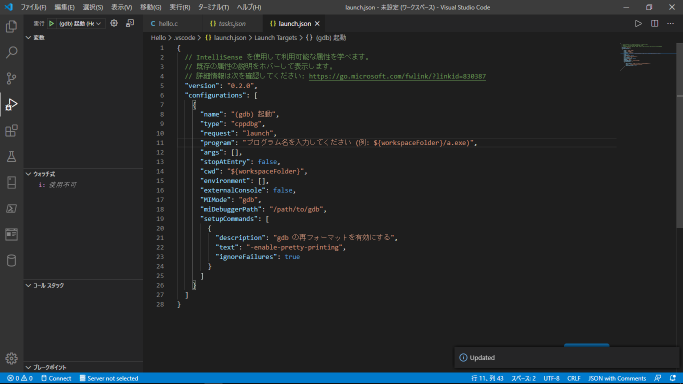
4. launch.jsonの作成

launch.jsonファイルを作成するには以下の手順を行います
Ctrl+Shift+Dを押します
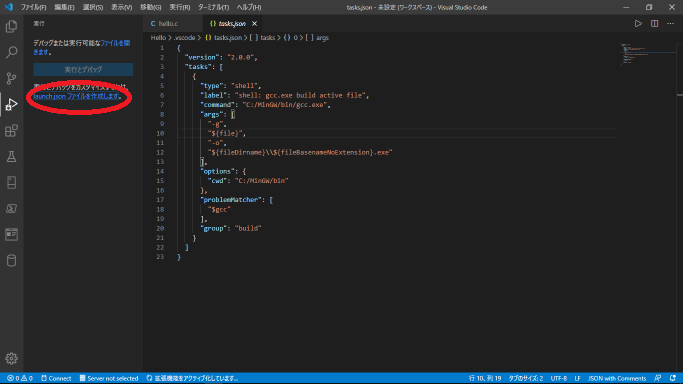
左の実行ボタンがアクティブになり下の画像のようになります
赤丸の「launch.json ファイルを作成します」をクリックします
f:id:Jikoryuu:20200531145151p:plain
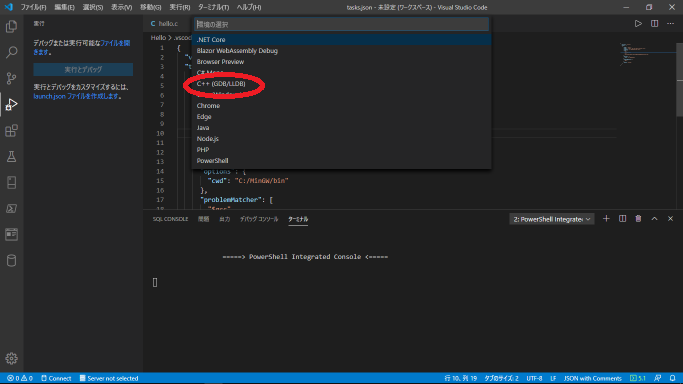
「環境の選択」のリストが現れるので「C++ (GDB/LLDB)」を選択します
f:id:Jikoryuu:20200531145219p:plain
下の画像の「launch.json」が作成されます
f:id:Jikoryuu:20200531145321p:plain

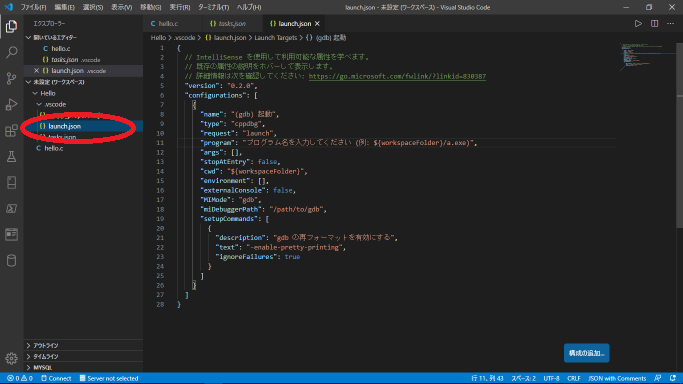
5. launch.jsonの編集

launch.jsonを編集するためにlaunch.jsonを選択します
f:id:Jikoryuu:20200531145344p:plain
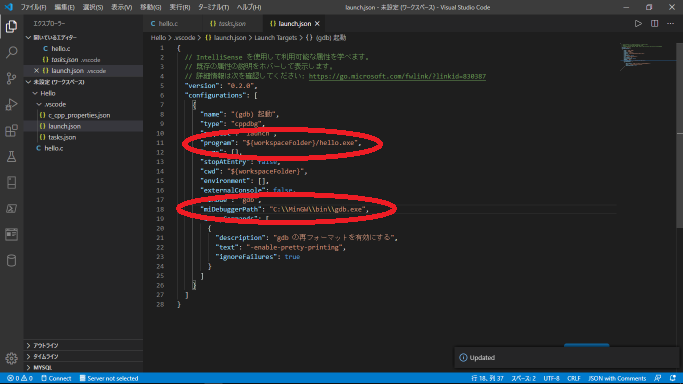
画像の赤丸の所を編集します
f:id:Jikoryuu:20200531145409p:plain
下記のパラメーターを変更します

"program": "プログラム名を入力してください (例: ${workspaceFolder}/a.exe)",
↓
"program": "${workspaceFolder}/hello.exe",

"miDebuggerPath": "/path/to/gdb",
↓
"miDebuggerPath": "C:\\MinGW\\bin\\gdb.exe",

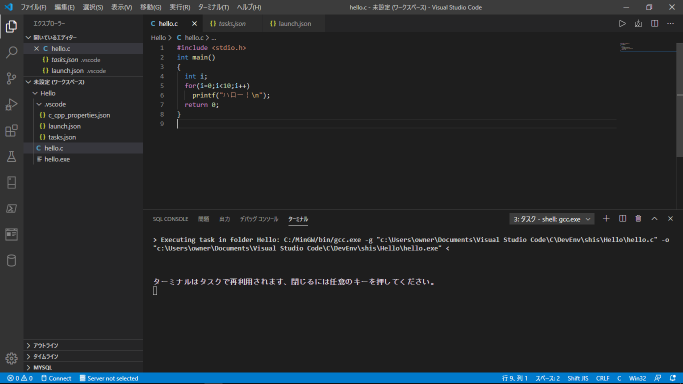
6. 実行ファイルの作成

hello.cファイルをアクティブ(選択・表示)します
Ctrl+Shift+Bを押します
コマンドパレットに「実行するビルド タスクを選択」にリストが現れるので「Shell:gcc.exe build active file」を選択します
f:id:Jikoryuu:20200531145436p:plain
hello.exeが作成されました
f:id:Jikoryuu:20200531145454p:plain

7. デバッグを開始する

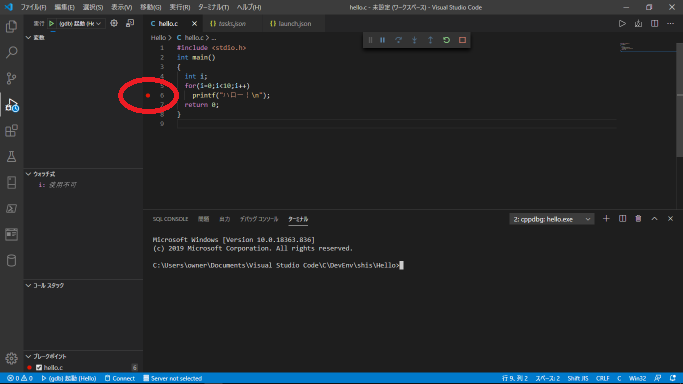
hello.cファイルをアクティブ(選択・表示)にして任意の場所にブレークポイントを置いてください
コードペインの行番号の左をクリックするかデバッグしたい行にカーソルを置いて「F9」キーを押すとブレークポイントができます
ブレークポイントが置かれるとコードペインの行番号の左に赤い●が現れます
ブレークポイントは幾つでも置けます

メニューの「実行」→「デバッグの開始」または「F5」キーを押します
するとデバッグが開始されます
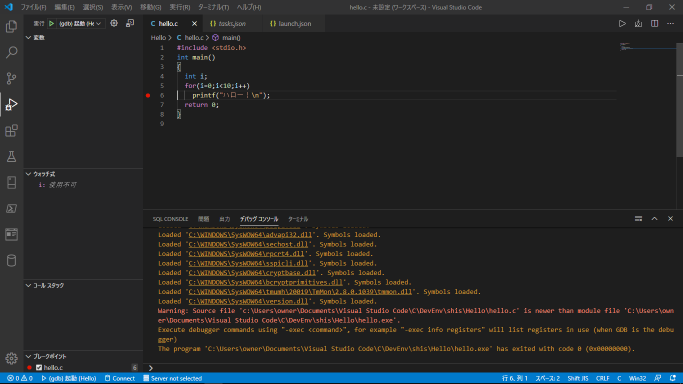
f:id:Jikoryuu:20200531145520p:plain
黄色いラインがブレークポイントで止まったらデバッグ環境の構築は成功です
f:id:Jikoryuu:20200531145618p:plain

8. 実行状態(結果)の表示

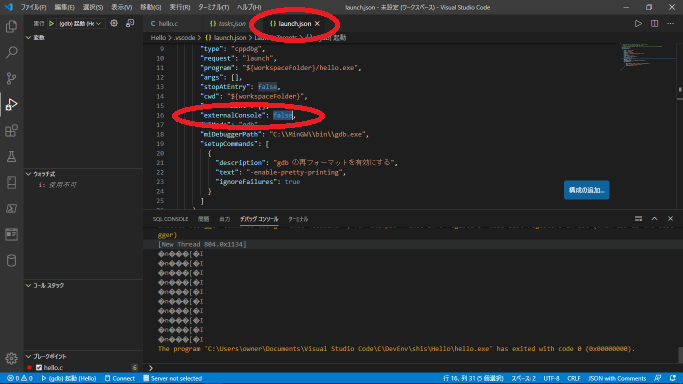
launch.jsonを編集するためにlaunch.jsonを選択します
(argsに日本語を使用しそれを表示した場合にexternalConsoleを使用すると文字化けするので注意[解決方法:stdlib.hをインクルードしsystem("chcp 65001");をprintfより前に追加することで文字化けが解消する])

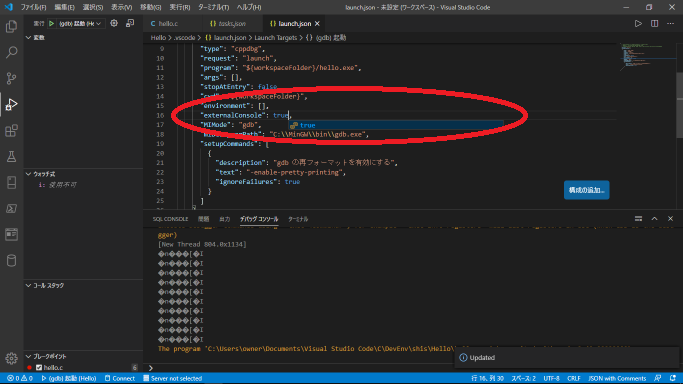
下記のパラメーターを変更します

"externalConsole": false,
↓
"externalConsole": true,

f:id:Jikoryuu:20200531145648p:plain
f:id:Jikoryuu:20200531145715p:plain
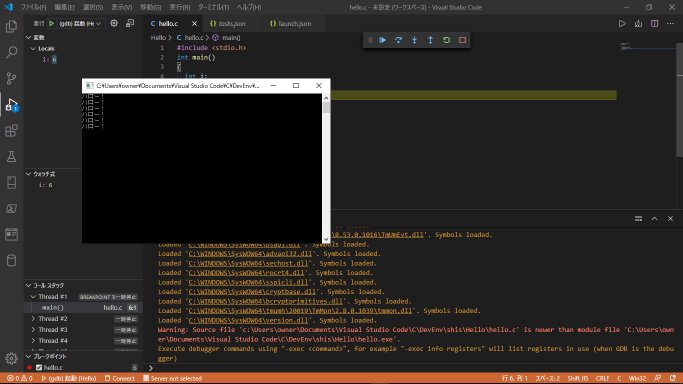
ターミナル(端末)が別窓で開き実行状態(結果)が表示されます
入力がある時にはここで入力できます
f:id:Jikoryuu:20200531145737p:plain
特にエラーが無ければデバッグ環境の構築成功です
f:id:Jikoryuu:20200531145757p:plain

9. デバッグでバグがありcファイルを編集したとき

6.の実行ファイルの作成「Ctrl+Shift+B」をしてからデバッグ「F5」をして下さい

デバッグができるまでの手順は以上です
お疲れさまでした

c_cpp_properties.json

{
    "configurations": [
        {
            "name": "Win32",
            "includePath": [
                "${workspaceFolder}/**"
            ],
            "defines": [
                "_DEBUG",
                "UNICODE",
                "_UNICODE"
            ],
            "windowsSdkVersion": "10.0.18362.0",
            "compilerPath": "C:/MinGW/bin/gcc.exe",
            "cStandard": "c11",
            "cppStandard": "c++17",
            "intelliSenseMode": "gcc-x64"
        }
    ],
    "version": 4
}

tasks.json

{
	"version": "2.0.0",
	"tasks": [
		{
			"type": "shell",
			"label": "shell: gcc.exe build active file",
			"command": "C:/MinGW/bin/gcc.exe",
			"args": [
				"-g",
				"${file}",
				"-o",
				"${fileDirname}\\${fileBasenameNoExtension}.exe"
			],
			"options": {
				"cwd": "C:/MinGW/bin"
			},
			"problemMatcher": [
				"$gcc"
			],
			"group": "build"
		}
	]
}

launch.json

{
  // IntelliSense を使用して利用可能な属性を学べます。
  // 既存の属性の説明をホバーして表示します。
  // 詳細情報は次を確認してください: https://go.microsoft.com/fwlink/?linkid=830387
  "version": "0.2.0",
  "configurations": [
    {
      "name": "(gdb) 起動",
      "type": "cppdbg",
      "request": "launch",
      "program": "${workspaceFolder}/hello.exe",
      "args": [],
      "stopAtEntry": false,
      "cwd": "${workspaceFolder}",
      "environment": [],
      "externalConsole": true,
      "MIMode": "gdb",
      "miDebuggerPath": "C:\\MinGW\\bin\\gdb.exe",
      "setupCommands": [
        {
          "description": "gdb の再フォーマットを有効にする",
          "text": "-enable-pretty-printing",
          "ignoreFailures": true
        }
      ]
    }
  ]
}

VSCodeでJavaのデバッグをできるようにする方法

VSCodeJavaデバッグをできるようにする方法

VSCodeデバッグでShift-JISのソースコードコンパイルすると文字化けするので必ずUTF-8で作成すること
尚、ターミナルで直接コンパイルする際は既定ではShift-JisなのでUTF-8コンパイルする際は-encording UTF-8を指定すること

aguments.javaの内容

public class arguments {
	public static void main(String[] args) {
		System.out.print(args[0]);
	}
}

注意点
Java Overviewが立ち上がる
※CMakeToolがあると勝手に自動構成される
プロジェクトを構成しています:開いているファイルを保存しています
使用するCMakeジェネレーターを特定できません。優先されるジェネレーターをインストールまたは構成するか、settings.json、キットの構成、またはPATH変数を更新してください。Error: 使用可能なジェネレーターが見つかりません

未指定を選択(指定するとJavaのコードがおかしくなる)

○workspaceを作成

javaファイルと同じ階層にworkspaceファイルを作成する
ファイル→名前を付けてワークスペースを保存
arguments.code-workspaceの内容

{
  "folders": [
    {
      "path": "." //1つ上のフォルダー[arguments]を指定
    }
  ],
  "settings": {
    "debug.allowBreakpointsEverywhere": true,//ブレークポイントを設定できるようにする
    "debug.inlineValues": true  //コード上で変数の値をツールチップで表示できるようにする
  },
  "launch": {}
}

デバッグボタンを押してlaunch.jsonを作成

実行→構成の追加
launch.jsonの内容

{
  // IntelliSense を使用して利用可能な属性を学べます。
  // 既存の属性の説明をホバーして表示します。
  // 詳細情報は次を確認してください: https://go.microsoft.com/fwlink/?linkid=830387
  "version": "0.2.0",
  "configurations": [
    {
      "type": "java",
      "name": "Debug (Launch)-arguments",
      "request": "launch",
      "mainClass": "arguments",
      "projectName": "arguments_402de46f",
      "console": "externalTerminal", //追加 internalConsole, integratedTerminal, or externalTerminal
      "encoding": "UTF-8",           //追加(ターミナルで使用する文字コード)
      "args": "ハロージャバワールド" //追加(コマンドライン引数がある場合は指定 ない場合はこの行を削除)
    }
  ]
}

○実行(デバッグ)

実行→デバッグの開始
エラーが出なければ成功です

【Python/Tkinter】画像ファイルをスクロールさせる

f:id:Jikoryuu:20200119093954p:plain

PILをインストールする必要があります
PILで扱える画像の種類はbmptiff、gif、jpg、pngtiffppm、pgmです
PILがインストールされてない場合はpipでインストールしてください

>pip install Pillow
import tkinter as tk
from tkinter import filedialog
from PIL import Image, ImageTk
root = tk.Tk()
root.geometry("600x400")
imgpass=tk.StringVar(value='')
# 画像を表示
def open_file():
  # ファイルダイアログ
  typ = [('画像ファイル', '*.jpg;*.jpeg;*.png;*.bmp;*.gif;*.tiff;*.ppm;*.pgm')]
  imgpass.set(filedialog.askopenfilename(filetypes = typ))
  if imgpass.get()=="":
    return 0
  # 表示するイメージを用意
  global img
  rimg = Image.open(imgpass.get())
  img = ImageTk.PhotoImage(rimg)
  canvas.create_image(0,0,image=img,tag="illust",anchor=tk.NW)
  # Canvasのスクロール範囲を設定
  canvas.config(scrollregion=(0,0,rimg.width,rimg.height))
# アプリケーションを終了
def close_disp():
  root.quit()
# メニューを作成
men = tk.Menu(root) 
root.config(menu=men)
menu_file = tk.Menu(root)
men.add_cascade(label='ファイル', menu=menu_file)
menu_file.add_command(label='開く', command=open_file) 
menu_file.add_separator() 
menu_file.add_command(label='終了する', command=close_disp)
# Canvas Widget を生成して配置
canvas = tk.Canvas(root)
canvas.grid(row=0,column=0,sticky=tk.W + tk.E + tk.N + tk.S)
root.grid_columnconfigure(0,weight=1)
root.grid_rowconfigure(0,weight=1)
# Scrollbar を生成して配置
barX = tk.Scrollbar(root, orient=tk.HORIZONTAL)
barX.grid(row=1, column=0, sticky="ew")
barY = tk.Scrollbar(root, orient=tk.VERTICAL)
barY.grid(row=0, column=1, sticky="ns")
# Scrollbarを制御をCanvasに通知する処理を追加
barY.config(command=canvas.yview)
barX.config(command=canvas.xview)
# Canvasの可動域をScreoobarに通知する処理を追加
canvas.configure(yscrollcommand=barY.set, xscrollcommand=barX.set)
canvas.configure(xscrollcommand=barX.set, yscrollcommand=barY.set)
# マウスホイールに対応
barY.bind('<MouseWheel>', lambda e:canvas.yview_scroll(-1*(1 if e.delta>0 else -1),tk.UNITS))
barY.bind('<Enter>',lambda e:barY.focus_set())
canvas.bind('<MouseWheel>', lambda e:canvas.yview_scroll(-1*(1 if e.delta>0 else -1),tk.UNITS))
canvas.bind('<Enter>',lambda e:barY.focus_set())
barX.bind('<MouseWheel>', lambda e:canvas.xview_scroll(-1*(1 if e.delta>0 else -1),tk.UNITS))
barX.bind('<Enter>',lambda e:barX.focus_set())

root.mainloop()

XAMPPとWebアプリケーションのインストール

XAMPPとWebアプリケーションをインストールした
 
■XAMPP
○XAMMP for Windows 5.6.21
C:\XAMPP\xampp-control.exe 3.2.2.0
https://www.apachefriends.org/jp/index.html
WebSever統合アプリケーション
Apache 2.4.17
C:\xampp\apache\bin\httpd.exe 2.4.17
Webサーバー
MariaDB(MySQL) 5.0.11
C:\xampp\mysql\bin\mysql.exe 10.1.13.0
データーベースサーバー
PHP 5.6.21
C:\xampp\php\php.exe 5.6.21.0
Perl 8.38 2015-11-23
C:\xampp\perl\bin\perl5.16.3.exe
Tomcat 1.0.15.0
C:\xampp\tomcat\bin\tomcat7w.exe 1.0.15.0
Apach付属のJSP(JavaServer Pages)サーブレット[Java Servlet]
 
 
Drupalのインストール
インストールに失敗するので調べたらphp.iniのResource Limitsのmax_execution_timeが
30では全然足らないとのことだった
これを300に設定し直してインストールすると上手くいった
php.iniを開くにはXAMPP Control PanelのApacheのConfigから開くと便利です
しかしDrupalのインストールには全体で2時間くらいかかるので注意が必要です